Gigaset IP BASE COMFORT base station II
Set up and use

Get to know the device
Buttons and connections
- Display
- Status bar
- Display keys
- End call key / On/off key
- Control key / Menu key
- Hash key / Lock key
- Recall key
- Microphone
- Star key
- Headset connector (3.5 mm jack)
- Key 1
- Talk key / Handsfree key
- Message key
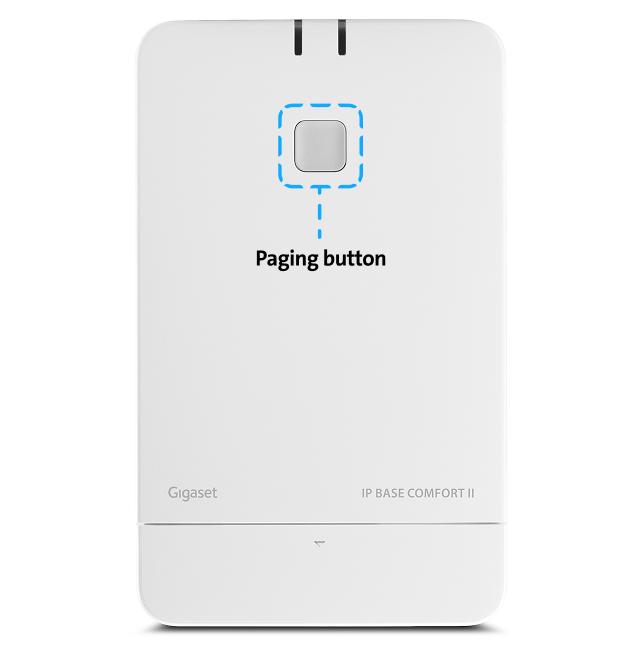
A Registration/paging key
| Locate a handset (paging): | Press briefly (1 sec.) - right LED flashes blue.All registered handsets ring simultaneously. |
| Register handset: | Press and hold (3 seconds) and release - left LED flashes green. Registering the handsets. |
| Reset device to factory settings: | Press for 10 seconds until both LEDs go out. Release and press again for 3 seconds until the LEDs light up red.After releasing, the device is reset to factory settings |
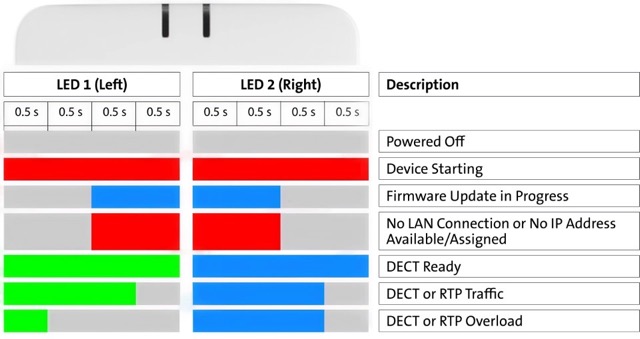
LED behaviour
Frequently asked questions
How many devices can be connected to the Gigaset IP BASE COMFORT 2 base station?
A maximum of 8 DECT handsets can be connected. The number of simultaneous calls depends on your landline connection, but a maximum of 5 parallel calls are possible. Connect the DECT handset to either the Internet-Box or the base station.
Which routers are compatible with the Gigaset IP BASE COMFORT base station?
Centro Business 2.0, 3.0 and all Internet-Box.
How do I set up call forwarding?
You can configure settings directly on your handset to forward calls or reject calls you do not wish to take. Proceed as follows:
- Menu
- Network services
- Options
- Scroll down and set up service (call forwarding, reject unknown calls etc.) > OK
The following Swisscom services are available:
| Forward | Divert incoming calls to another telephone number |
| Do not disturb | Divert all incoming calls to a message |
| Block anonymous calls | Divert all calls with suppressed telephone number to a message |
| Call barring | Enter the telephone number of the last call in a black list. Calls with this telephone number are no longer diverted to the handset. |
How do I activate ‘Do not disturb’?
When active, callers will hear the engaged tone.
- Activate: *26#
- Deactivate: #26#
How do I reject anonymous calls?
When active, callers will hear the engaged tone.
- Activate: *99#
- Deactivate: #99#
How do I set up call blocking?
- Everything you need to know: Managing Callfilter and blocking numbers
Why does the initial setup take so long?
When you first set up a Gigaset IP BASE COMFORT II, it may need to update to the latest firmware. This can take up to 15 minutes. Wait until LED 1 lights up green and LED 2 lights up blue.
How do I update the firmware?
Your base station’s firmware will update automatically as soon as a new version is available.
How do I pair a device?
- Press the pair button for 3 seconds LED flashes green
- Switch on device Choose language
Optional: If there is more than one telephone number, the device will show the telephone number wizard. You can then use this to select the outgoing and incoming telephone number.
Which devices are supported?
- Gigaset CL660HX
- Gigaset Comfort 551HX
- Gigaset E560HX (basic GAP functions only, full support from 2026)
- HD phones with GAP
Can I pair other devices?
- Yes, all GAP-enabled devices (basic functions only)
- Use the WebGui to pair and assign phone numbers.
How do I log in to the WebGui?
- Once you have paired your device, press the page button on the base station. The devices will ring and display the IP address for the base station.
- Enter this IP address in your browser and log in using the username: ‘user’ and password: ‘user’. You will then need to set a new password for the user.
Optional: To reset the user password to the default, you will need to reset the base station to factory settings.
Which settings can be configured in the WebGui?
- Network: You can manually assign an IP address to the base station.
- SIP accounts: Displays all paired devices and telephone numbers. You can assign incoming and outgoing telephone numbers in this view.
- Devices: You can manage your devices here. Add, delete and change devices. Configure settings on the devices.
- Telephony: Switch HD Voice on and off • System: Change the user password. General base station settings.
- Status: Provides a current overview of the base station. Export diagnosis data for support.
Choose your support option
Möchten Sie etwas bestellen? Wir beraten Sie
Manage your products, services and data directly in your account.
Open My Swisscom(opens a new window)
The digital assistant Sam helps you with questions about your Swisscom products.
Start ChatGet personal help from experienced Swisscom customers.
Go to help