Set up VPN connection
Activating routers for VPN
A VPN (Virtual Private Network) protects your data and privacy. It encrypts your Internet traffic and hides your IP address. This allows you to use the Internet securely and anonymously, including on public WLAN networks.
You can use various VPN types with the Swisscom Internet-Box:
- WireGuard: fast and modern
- L2TP/IPsec: widely used
- IKEv2: stable when changing network
One-time router activation
Make sure that your device is connected to the router. Type http://internetbox.swisscom.ch(opens in new tab) or 192.168.1.1 into your Internet browser (e.g. Chrome or Safari) and register in the web portal.
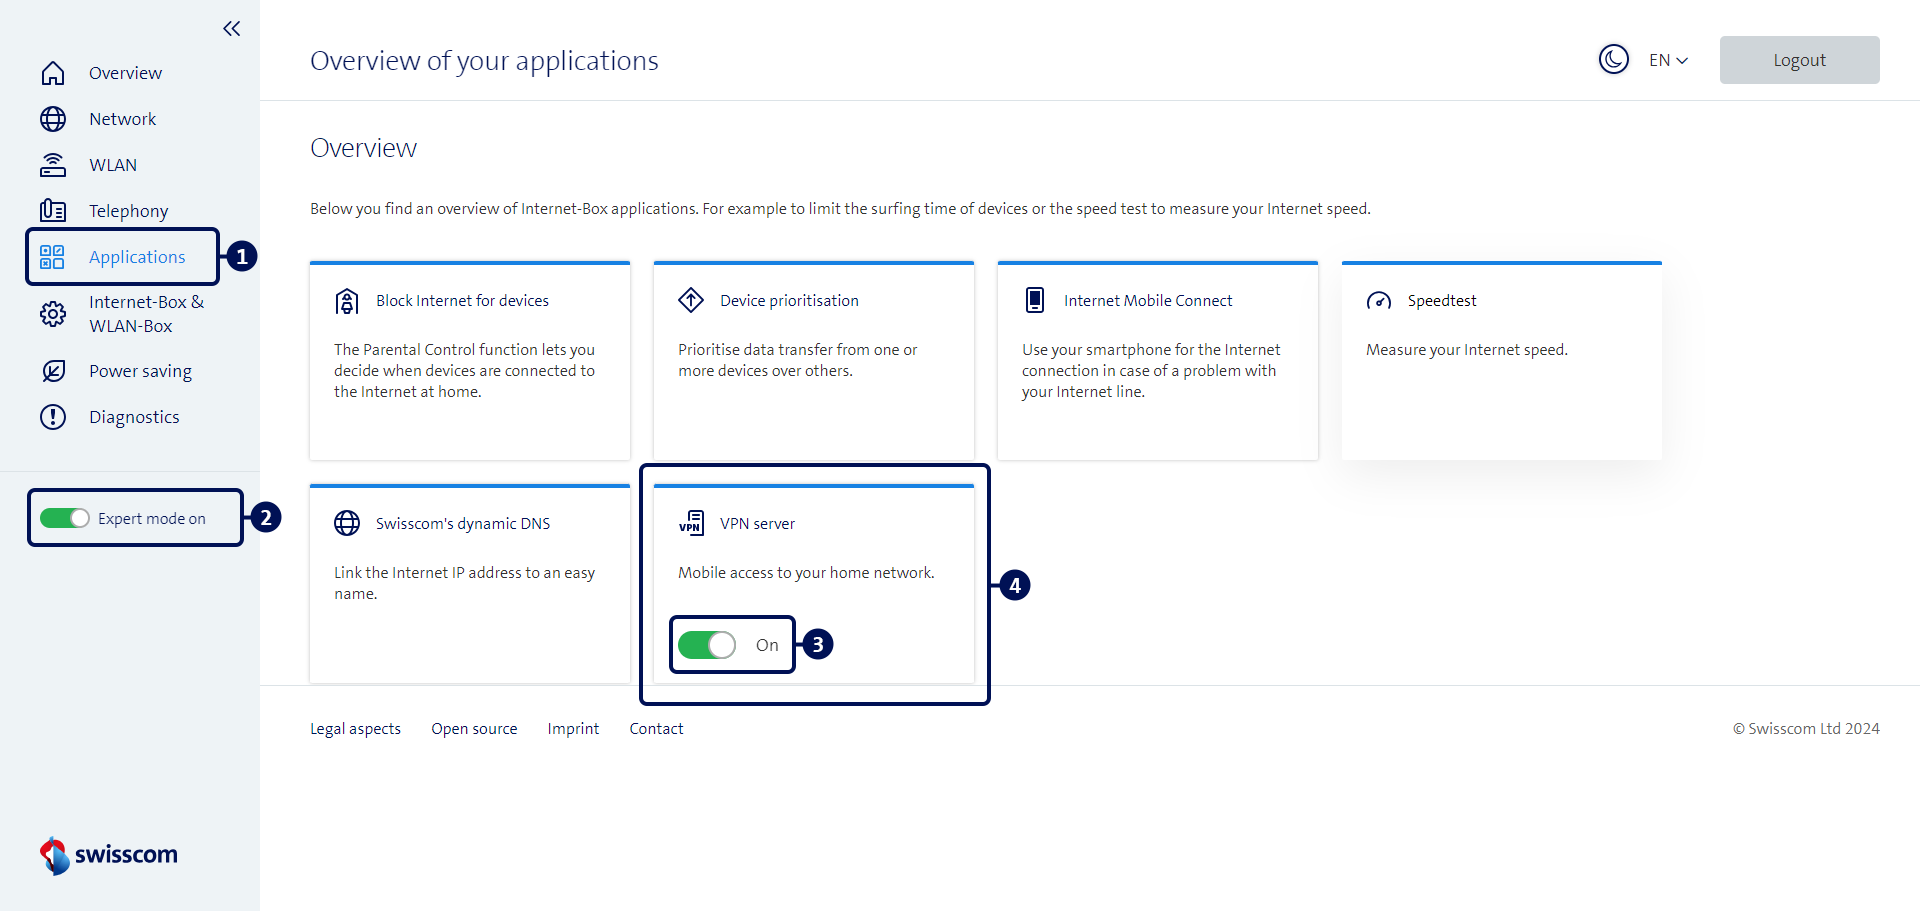
- Select “Settings” from the menu.
- Activate expert mode.
- Activate the slider in the “VPN server” tab.
- Open the VPN Server application.
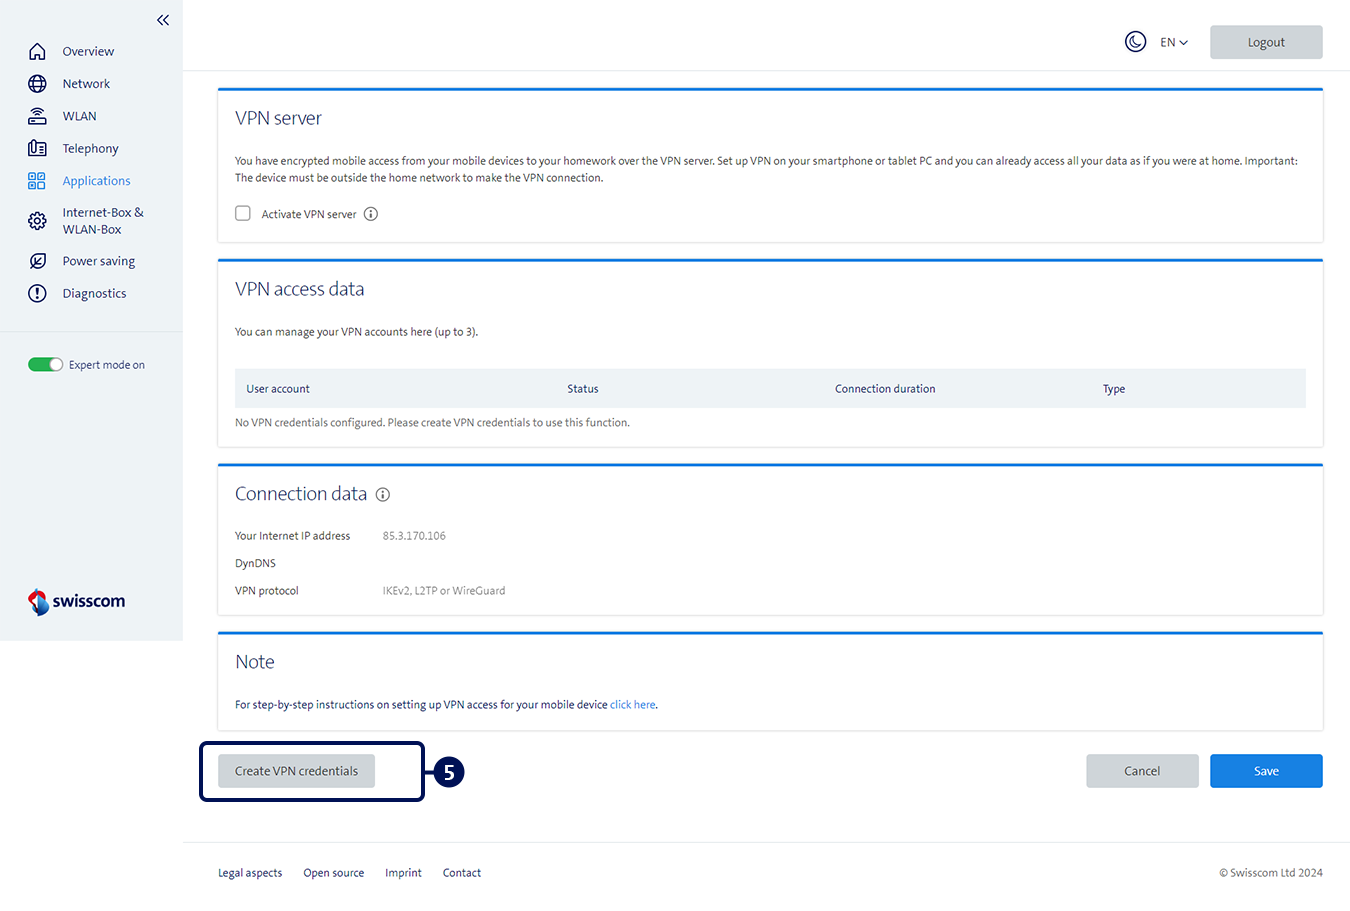
- Navigate down to “Add VPN access data”.
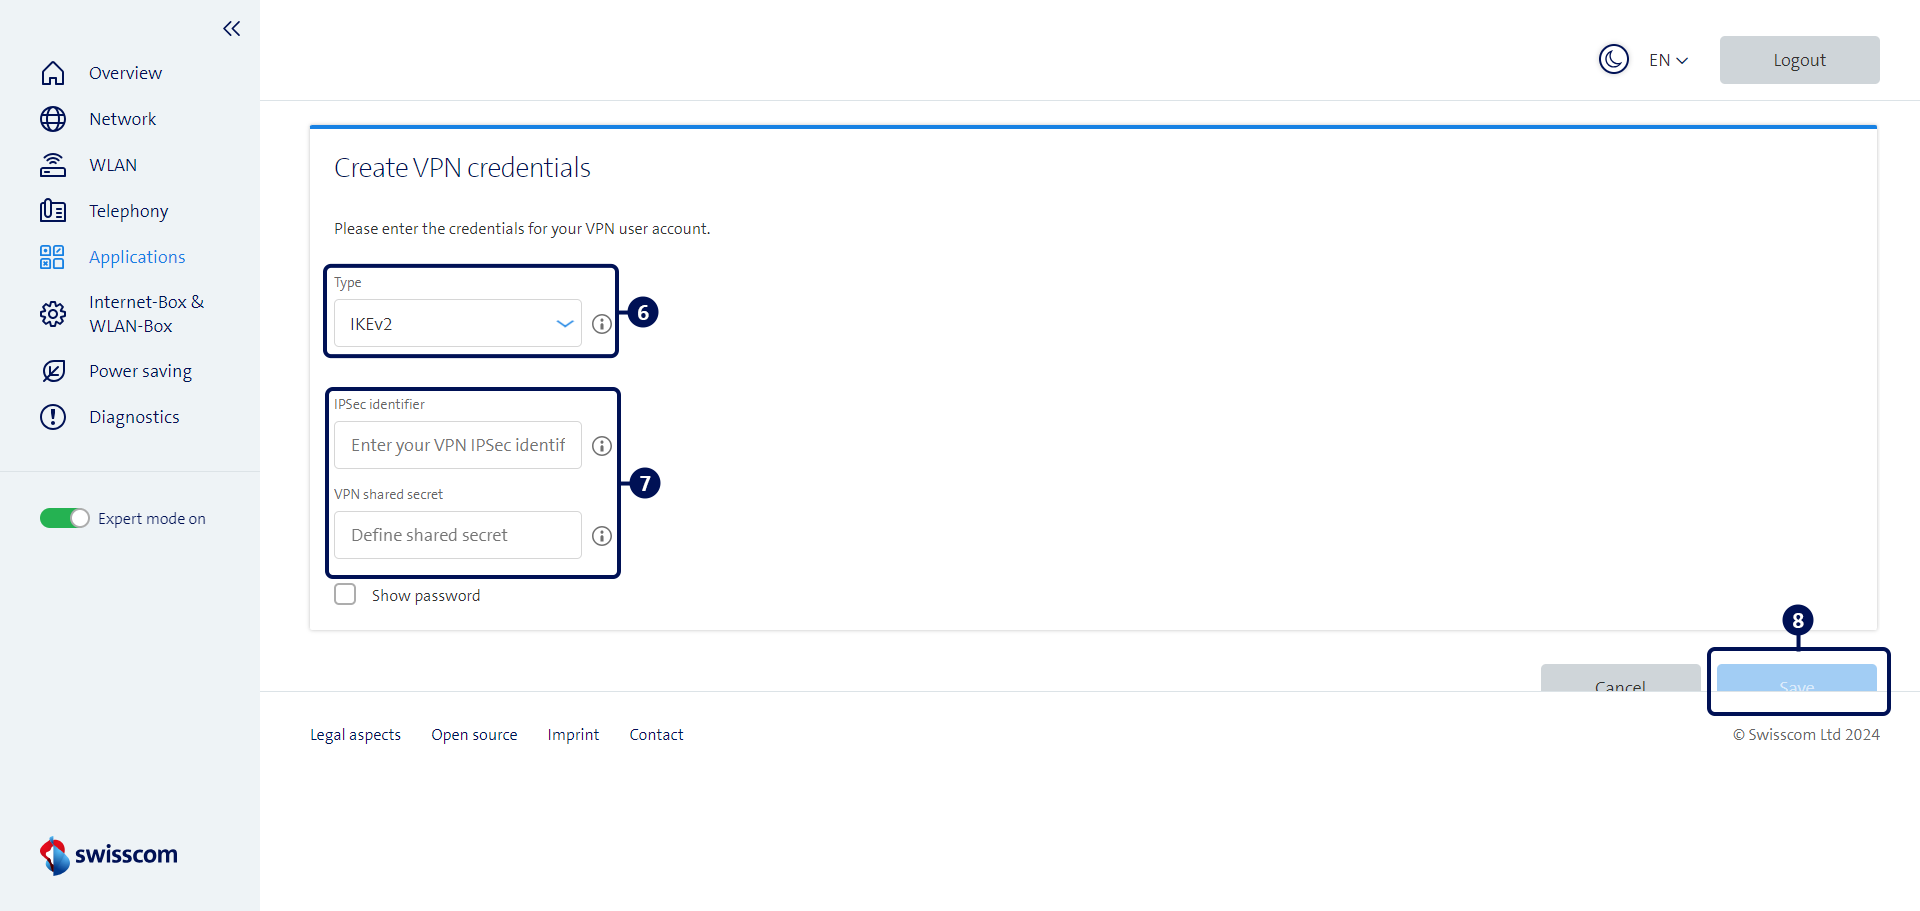
- Select your corresponding type (WireGuard, IKEv2 or L2TP).
- Enter your personal login details.
- Save your entries.
Setting up VPN on iOS
Setting up WireGuard
Our recommendation
- Install the WireGuard app(opens in new tab) on your iPhone.
- Open the app.
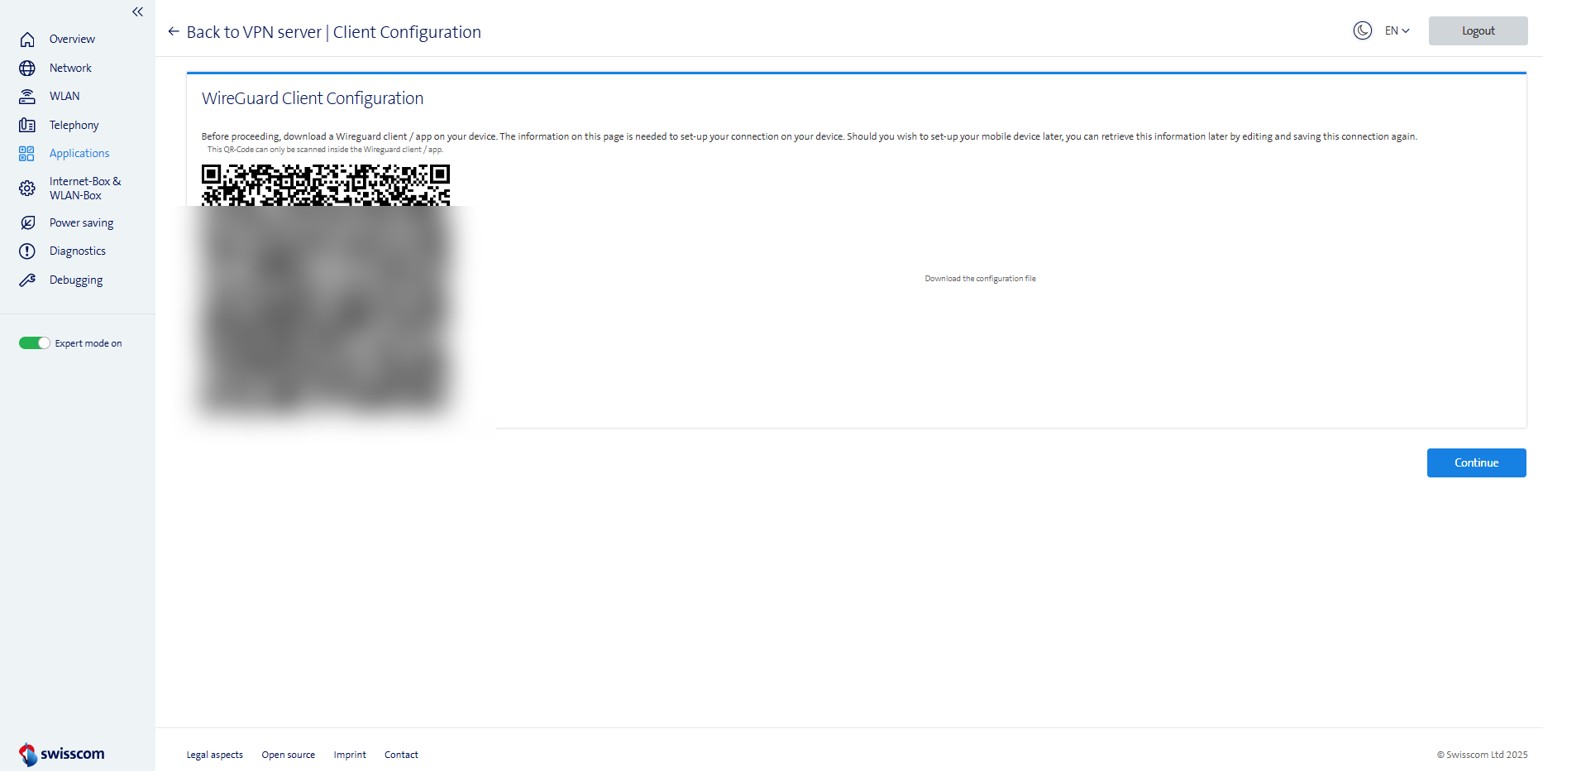
- Scan the QR code in the web portal (see “One-time router activation” after step 8).
- Save the settings. Your VPN connection is now ready to go.
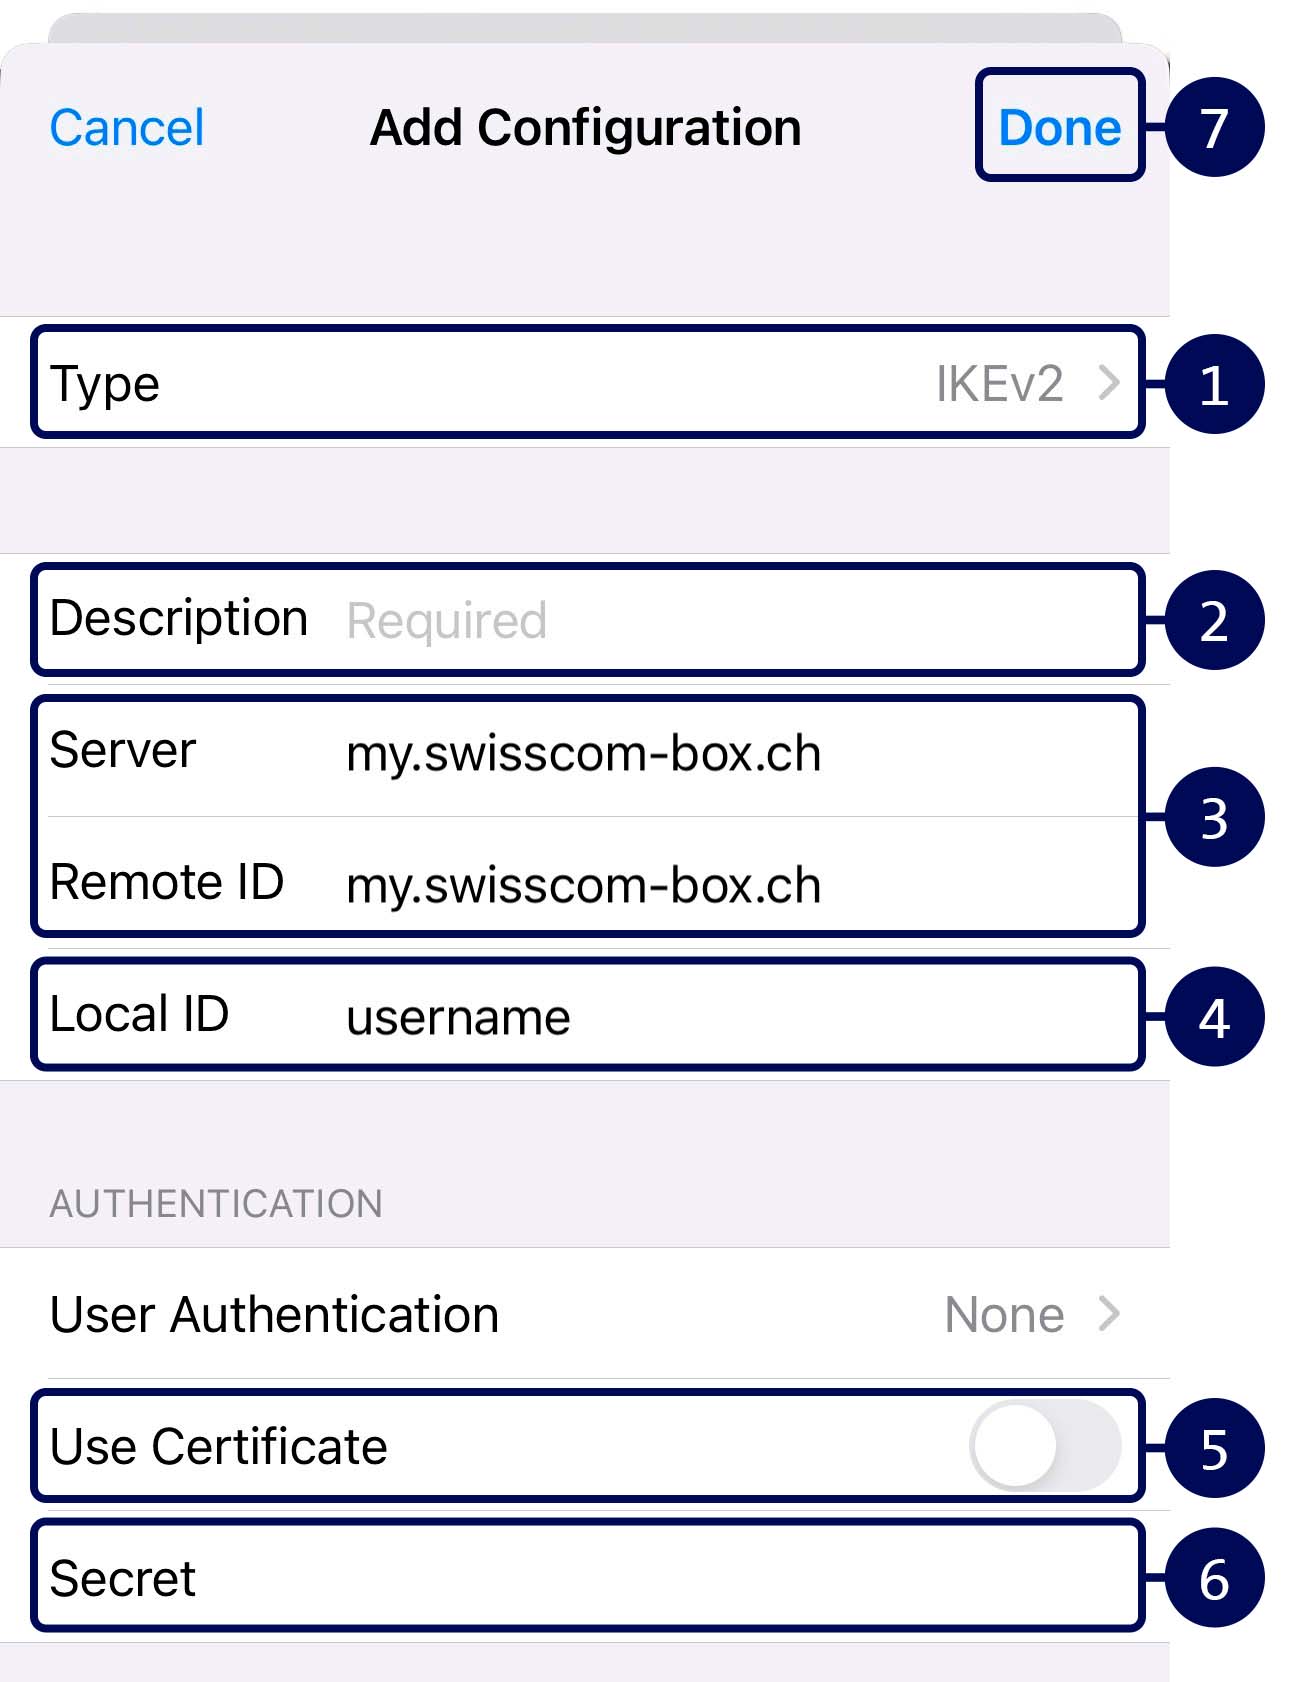
Set up IKEv2
In the device settings, go to “VPN” and select “Add VPN”. Then follow these steps:
- Select “IKEv2” as the VPN protocol.
- Enter a name for the new VPN connection.
- Enter your DNS name from the Internet-Box web portal. We recommend always selecting the same DynDNS account as the server address.
- Enter your VPN user name from the Internet-Box web portal.
- Select the option for no user authentication and deactivate “Use Certificate”.
- Enter the VPN password you set previously.
- Save the settings. You can now start the VPN connection.
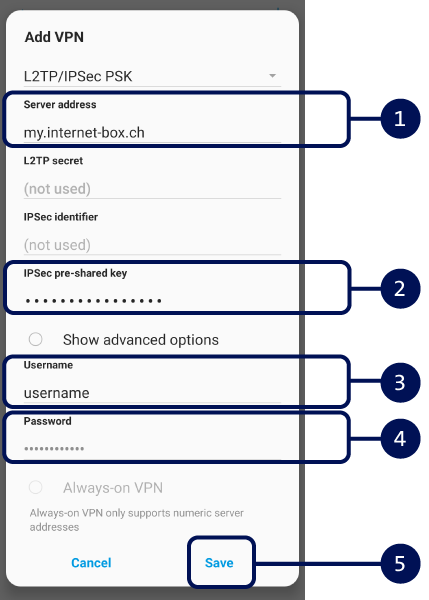
Set up L2TP
In the device settings, go to “VPN” and select “Add VPN”. Then follow these steps:
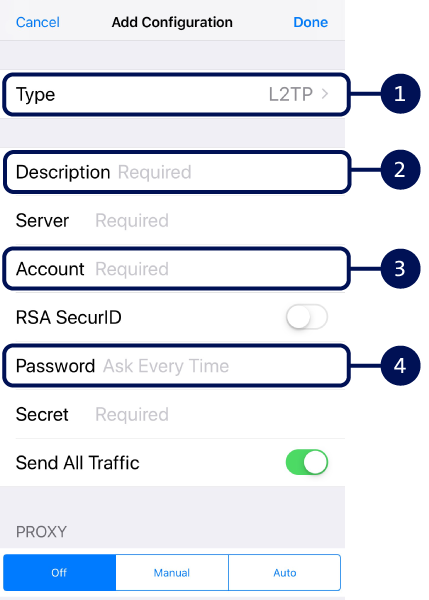
- Select “L2TP” as the VPN protocol.
- Enter a name for the new VPN connection.
- Enter your VPN user name from the Internet-Box web portal.
- Enter your previously set VPN password.
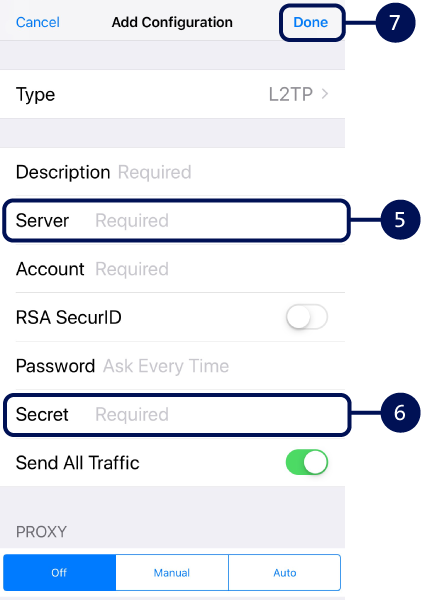
- Enter your DNS name from the Internet-Box web portal. We recommend always selecting the same DynDNS account as the server address.
- Enter your personal VPN Shared Secret key.
- Save your entries and activate the connection via VPN.
Setting up VPN on Android
Setting up WireGuard
Our recommendation
- Install the WireGuard app(opens in new tab) on your smartphone.
- Open the app.
- Scan the QR code in the web portal (see “One-time router activation” after step 8).
- Save the settings. Your VPN connection is now ready to go.
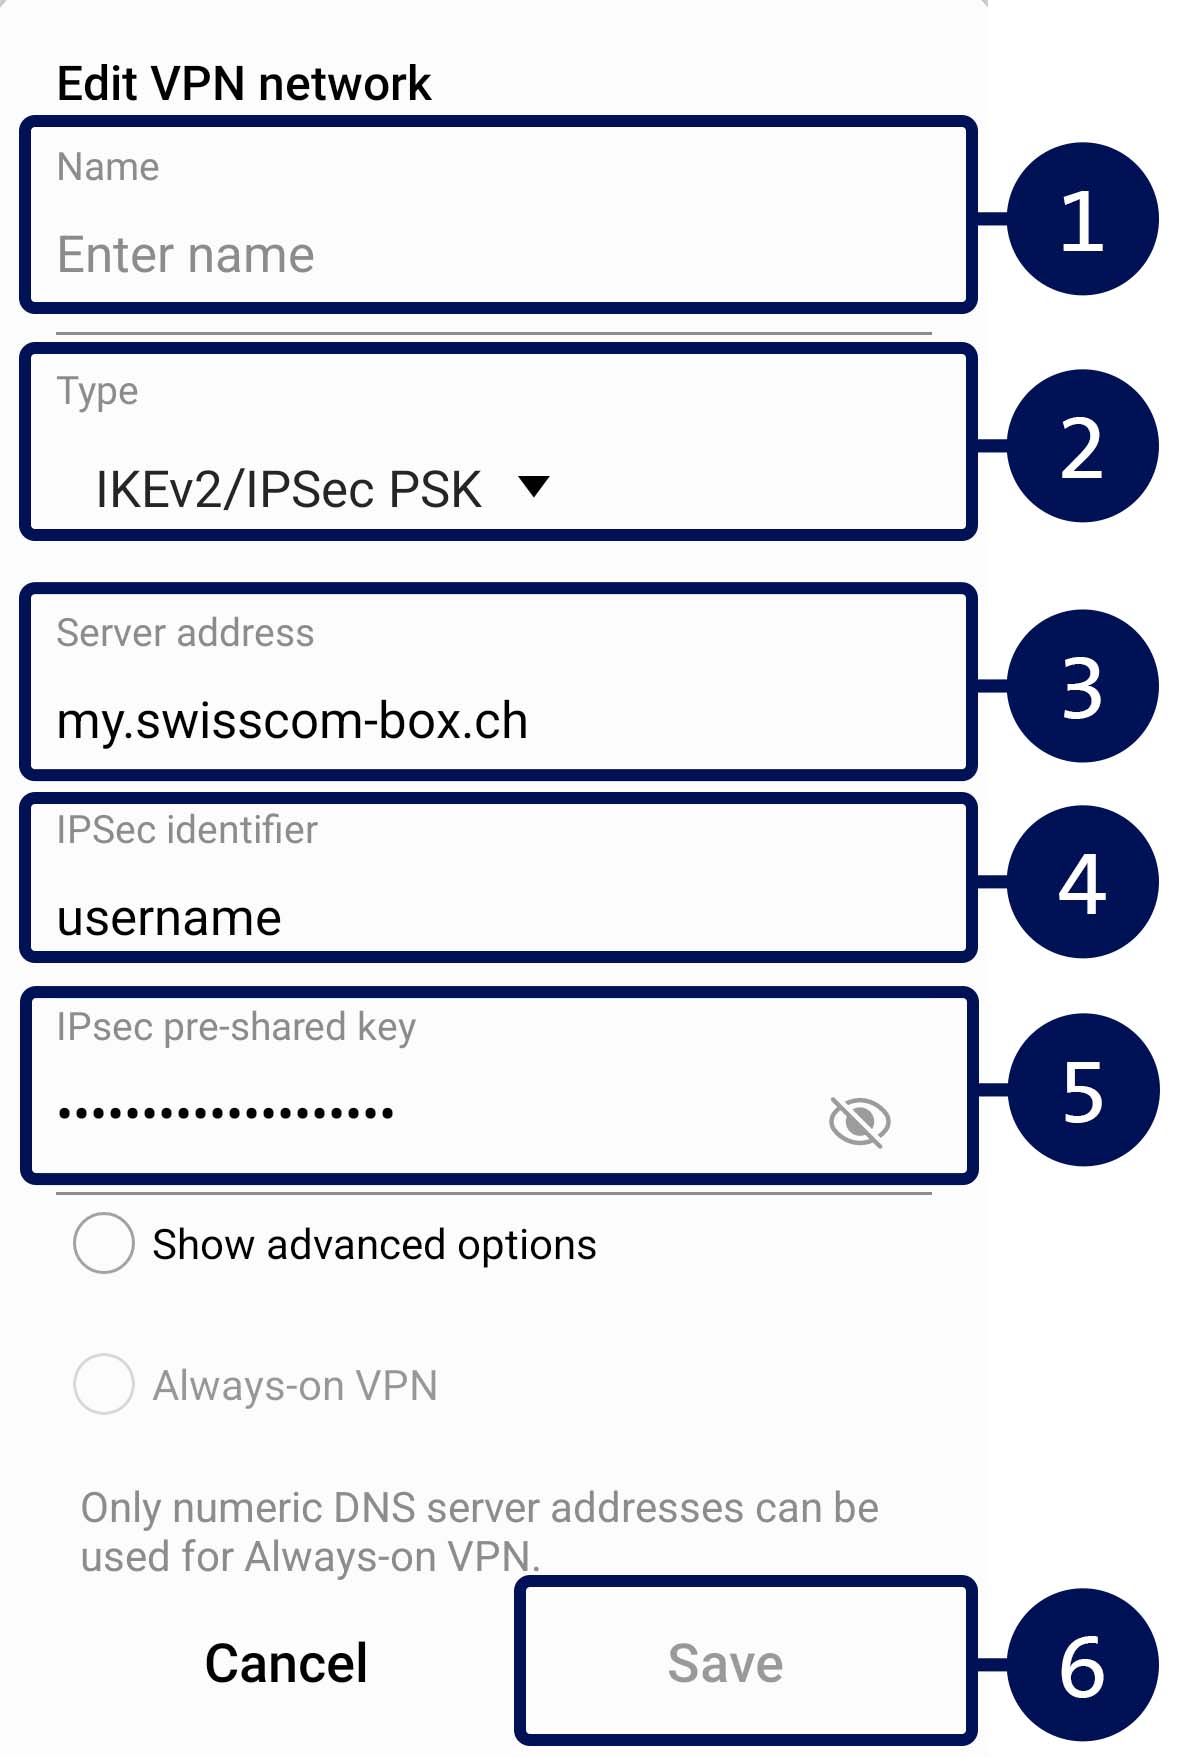
Set up IKEv2
In the device settings, go to “Connection” “Additional settings” and “VPN” and select “+”. Then follow these steps:
- Enter a name for the new VPN connection.
- Select the type “IKEv2/IPSec PSK”.
- Enter your DNS name from the Internet-Box web portal. We recommend always selecting the same DynDNS account as the server address.
- Enter your VPN user name from the Internet-Box web portal.
- Enter the VPN password you set previously.
- Save the settings. You can now start the VPN connection.
Set up L2TP
In the device settings, go to “Connection” “Additional settings” and “VPN” and select “+”. Then follow these steps:
- Enter your DNS name from the Internet-Box web portal. We recommend always selecting the same DynDNS account as the server address.
- Enter your personal VPN Shared Secret key.
- Enter the VPN user name from the Internet-Box web portal.
- Enter your previously set VPN password. Tip: Ensure that this box is checked to avoid having to enter your details again.
- Select “Save”.
Setting up VPN on Mac
Setting up WireGuard
Our recommendation
- Install the WireGuard app(opens in new tab) on your Mac.
- Open the app.
- Download the configuration file from the web portal and import it into the app (see “One-time router activation” after step 8).
- Save the settings. Your VPN connection is now ready to go.
Set up IKEv2
In the system settings, go to “Network” and add a new IKEv2 VPN connection. Then follow these steps:
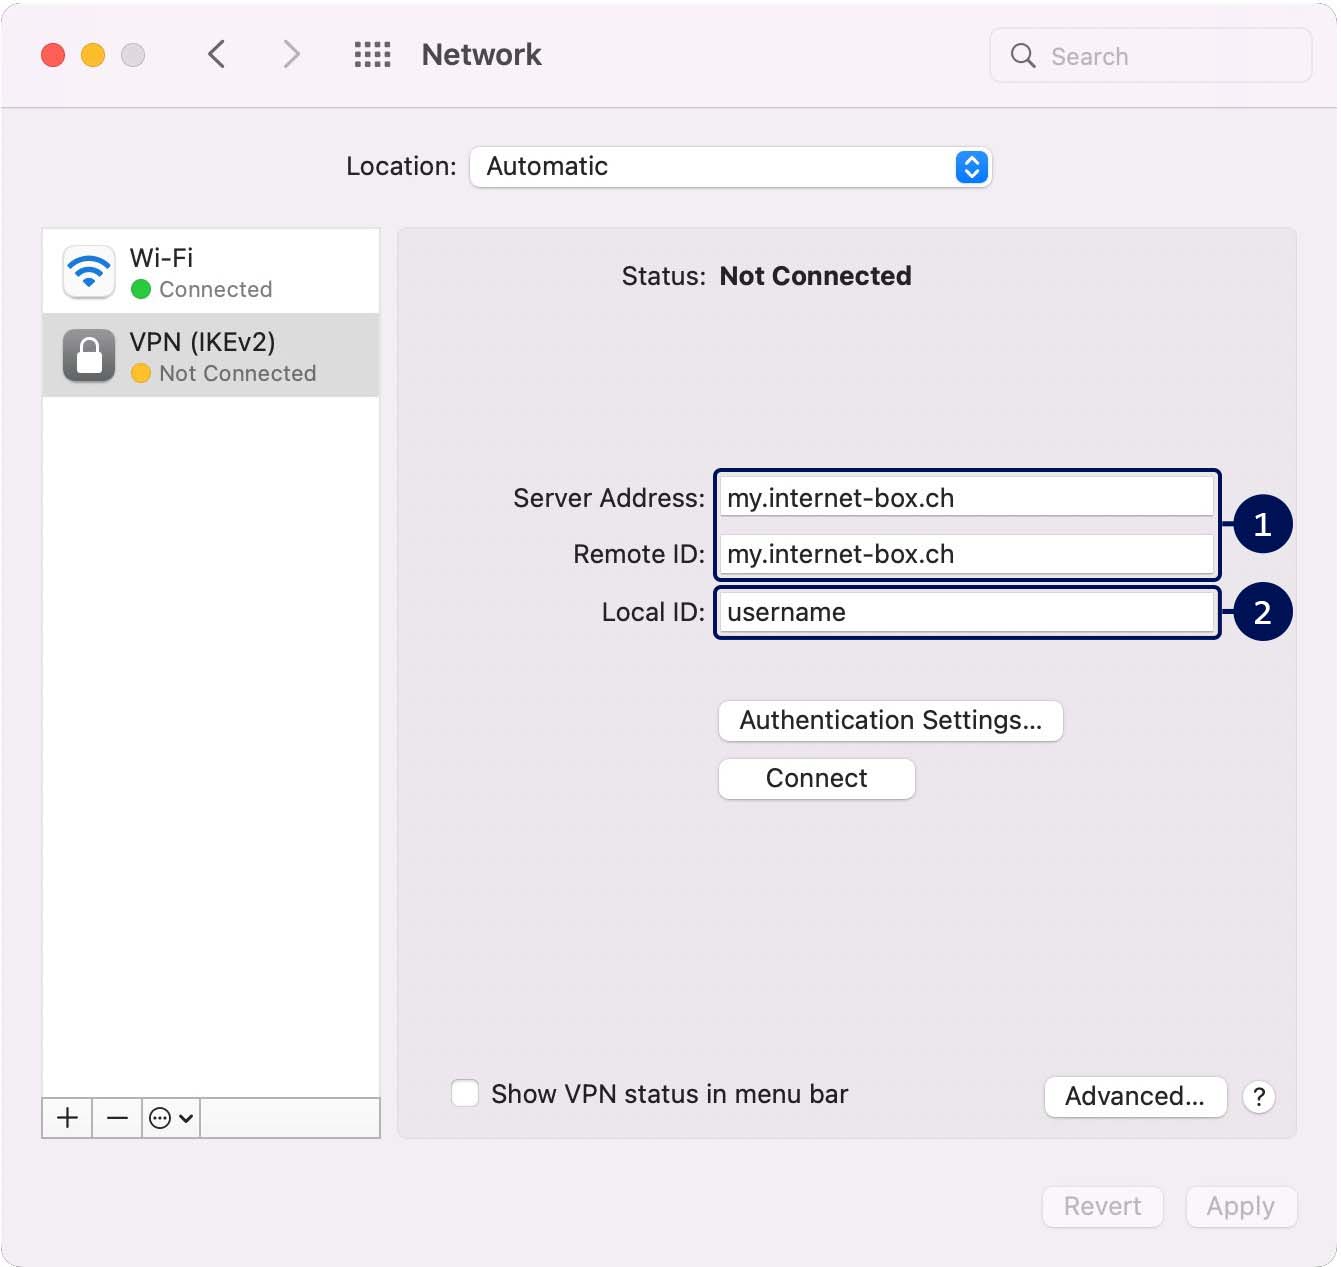
- Enter the name or, if required, the IP address from the Internet-Box web portal. We recommend always selecting the same DynDNS account as the server address.
- Enter the VPN user name from the Internet-Box web portal.
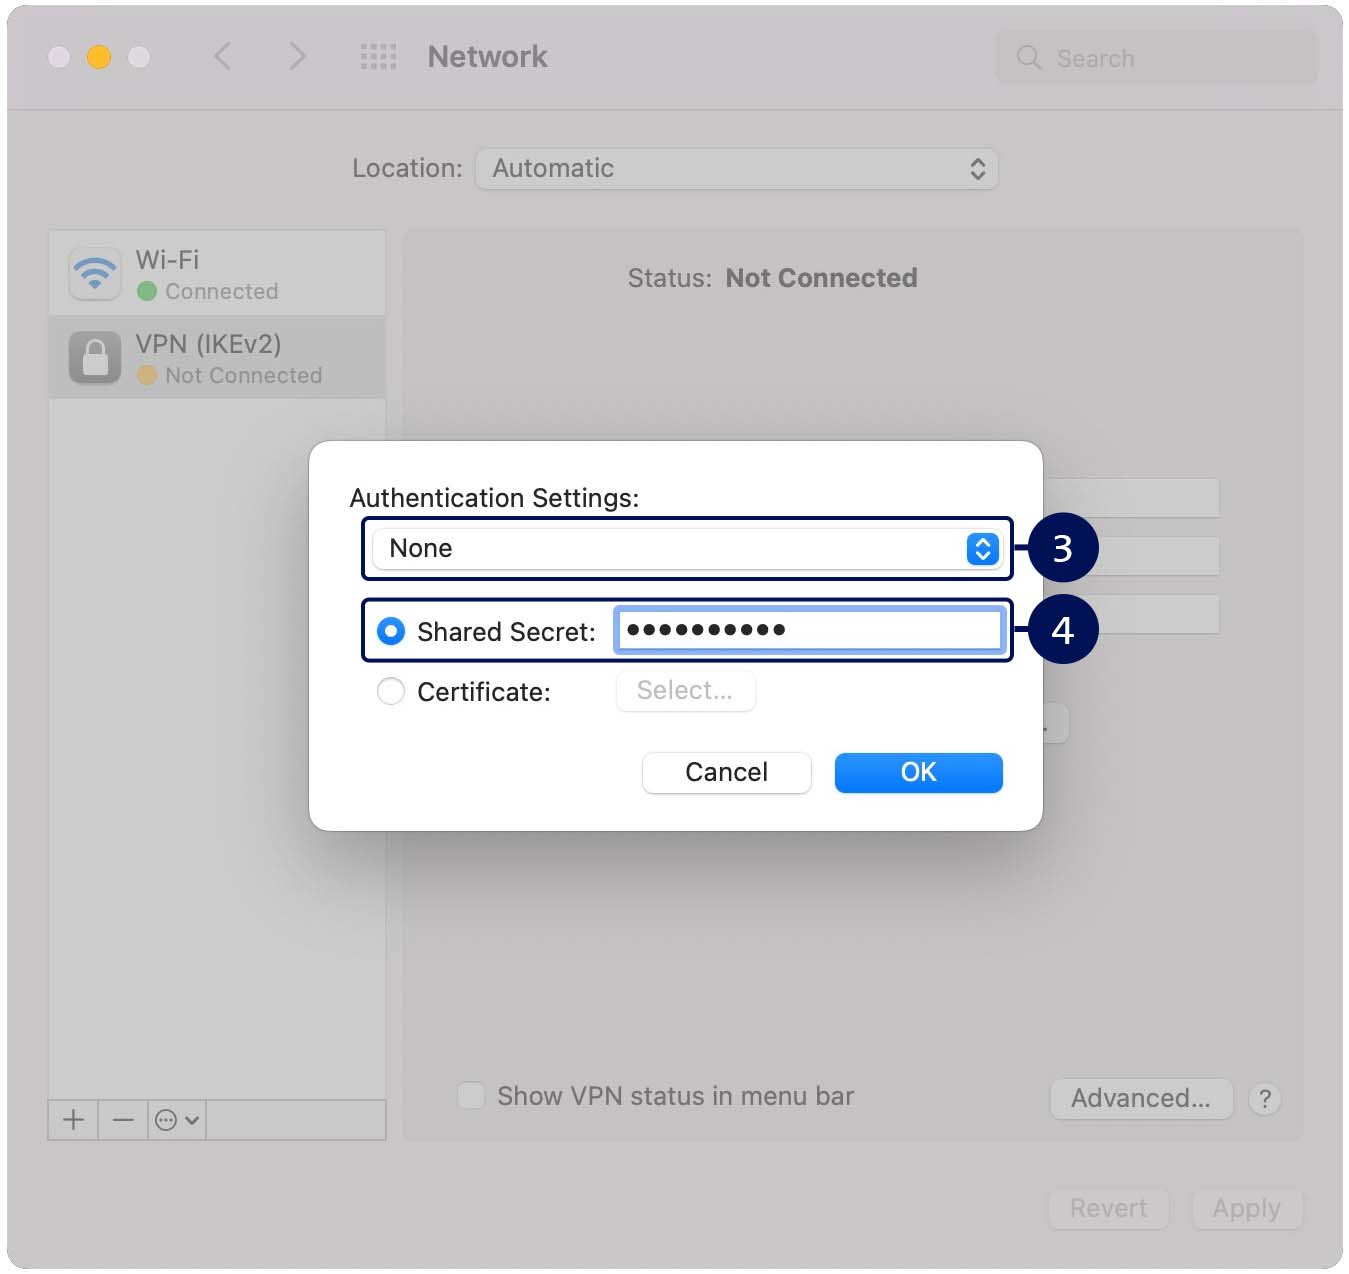
- Click on “Authentication Settings” for further settings and select the option for no user authentication.
- Enter the password you set from the Internet-Box web portal. Click "Connect” to test your entries.
Tip: Activate the VPN status display so you can manage your VPN connection at any time via the menu bar.
Set up L2TP
In the system settings, go to “Network” and add a new IKEv2/IPSec VPN connection. Then follow these steps:
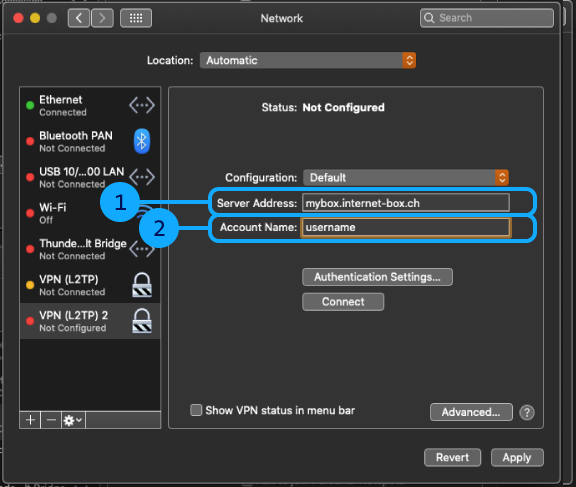
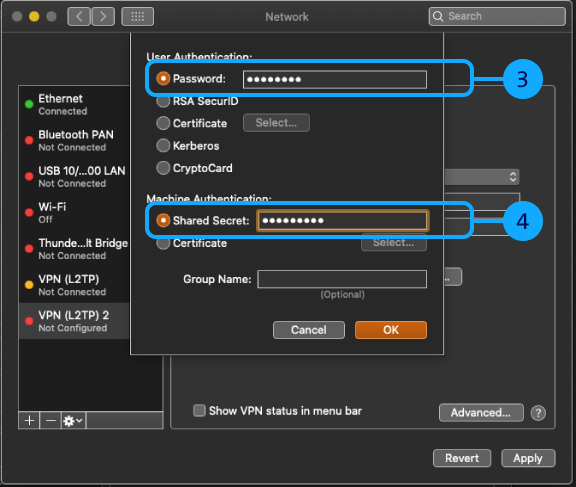
- Enter the name or, if necessary, the IP address from the Internet-Box web portal. We recommend always selecting the same DynDNS account as the server address.
- Enter the VPN user name from the Internet-Box web portal.
- Click “Authentication Settings…” to perform further settings and enter the VPN password that you set for the Internet-Box web portal.
- Enter your personal VPN Shared Secret key and confirm your entry. Click "Connect” to test your entries. Tip: Activate the VPN status display so you can manage your VPN connection at any time via the menu bar.
Setting up VPN on Windows
Setting up WireGuard
Our recommendation
- Install the WireGuard app(opens in new tab) on your computer.
- Open the app.
- Download the configuration file from the web portal and import it into the app (see “One-time router activation” after step 8).
- Save the settings. Your VPN connection is now ready to go.
Set up L2TP for Windows 10
In the system settings, go to “Network” and add a new IKEv2/IPSec VPN connection. Then follow these steps:
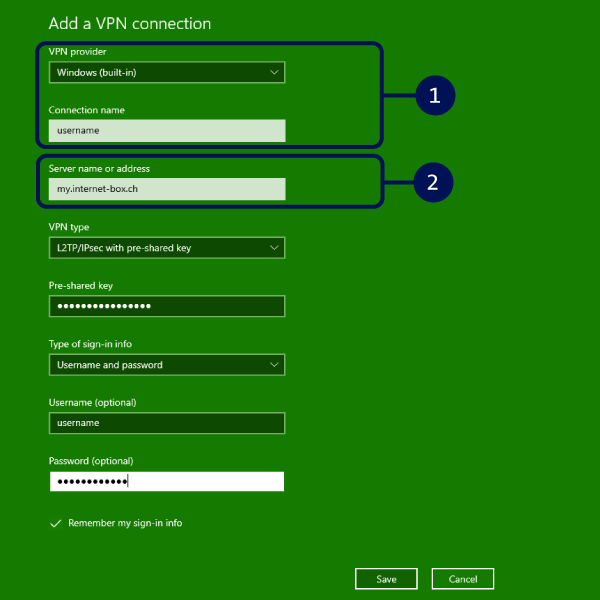
- From the dropdown menu, select “Windows” and enter a name for the new VPN connection.
- Enter your DynDNS name from the Internet-Box web portal. We recommend always selecting the same DynDNS account as the server address.
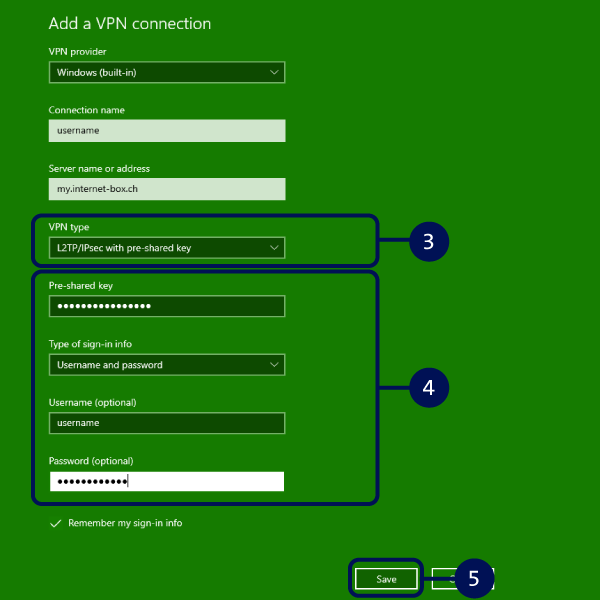
- Select VPN type “L2TP/IPsec with pre-installed key”.
- Enter the VPN Shared Secret, password and user name from the Internet-Box web portal.
- Save the settings. Check whether the VPN connection can be established.
Set up L2TP for Windows 11
In the system settings, go to “Network” and add a new IKEv2/IPSec VPN connection. Then follow these steps:
- From the dropdown menu, select “Windows” and enter a name for the new VPN connection.
- Enter your DynDNS name from the Internet-Box web portal. We recommend always selecting the same DynDNS account as the server address.
- Select VPN type “L2TP/IPsec with pre-installed key”.
- Enter the VPN Shared Secret, password and user name from the Internet-Box web portal.
- Click on “Save” to apply the settings.
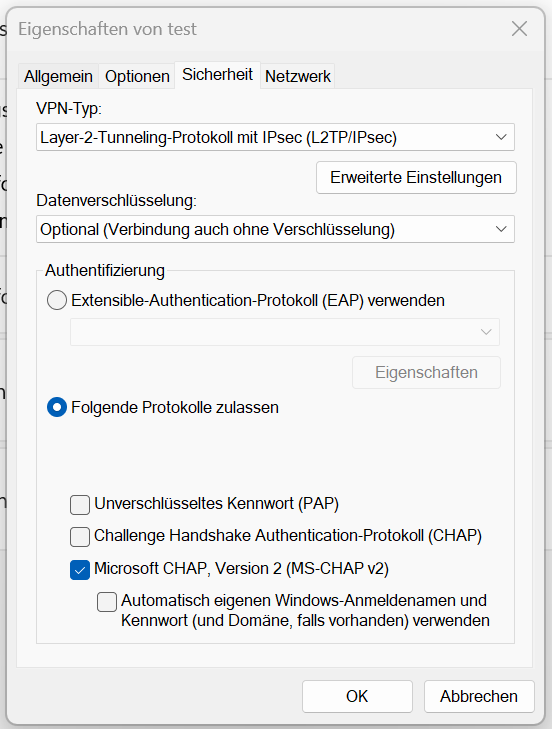
- Go to the advanced options in the VPN you have just set up.
- Navigate to “Further VPN Properties” and open “Edit”.
- Open the “Security” tab and select “Allow the following protocols”. Make sure that “Microsoft CHAP, Version 2 (MS-CHAP v2)” is ticked.
- Confirm with “OK”. The process is now complete.
FAQs
Why doesn’t the VPN connection work at home?
If you are connected directly to your home network, your VPN will not work. You should test your VPN connection when you are using the Internet and your router remotely.
How many simultaneous VPN connections are possible?
You can activate three VPN connections on the Internet-Box 2, 3, 4, 5 and 5 Pro and use these simultaneously on different devices. Each VPN only works with one device at a time.
The Internet-Box plus only allows VPN connection.
How does the VPN connection work in the long term?
With Dynamic DNS (DynDNS), you can define your own web address for remote access to your home network.
Which VPN and Internet-Boxes are compatible?
- You can use WireGuard on the Internet-Box 3, 4 and 5 Pro.
- You can use IKEv2 on the Internet-Box 2, 3, 4 and 5 Pro.
- You can use L2TP on the Internet-Box 2, 3 and 4.
Choose your support option
Möchten Sie etwas bestellen? Wir beraten Sie
Manage your products, services and data directly in your account.
Open My Swisscom(opens a new window)
The digital assistant Sam helps you with questions about your Swisscom products.
Start ChatGet personal help from experienced Swisscom customers.
Go to help