WLAN-Box positioning and setup
The Swisscom WLAN-Box improves your WLAN reception in all rooms. You can also connect your Swisscom TV-Box wirelessly or use the WLAN-Box as a WLAN booster.
Recommended: set up the WLAN-Box in the app
How to automatically set up the WLAN-Box:
Tip: My Swisscom app
Set up your WLAN-Box simply in the My Swisscom app.

Open app or visit store
Alternatively: manually set up your WLAN-Box
Set up your WLAN-Box in just a few steps:
- Connect the WLAN-Box to the power supply in the desired location.
- Switch on the WLAN-Box and wait two minutes.
- Press the plus (+) button on the WLAN-Box and the Internet-Box plus (+) button within two minutes to pair the two devices. Repeat this step for all WLAN-Boxes if you wish to install more than one.
As soon as the status LED of the WLAN-Box lights up white, the installation has been successfully completed and your WLAN-Box is ready for operation.
Optimum WLAN-Box positioning
This way you benefit from the best WLAN:
- Centrally, freestanding & vertically: position the WLAN-Box vertically on a piece of furniture in the centre of the room with around 20 cm clearance from walls and away from any metal housing and other devices.
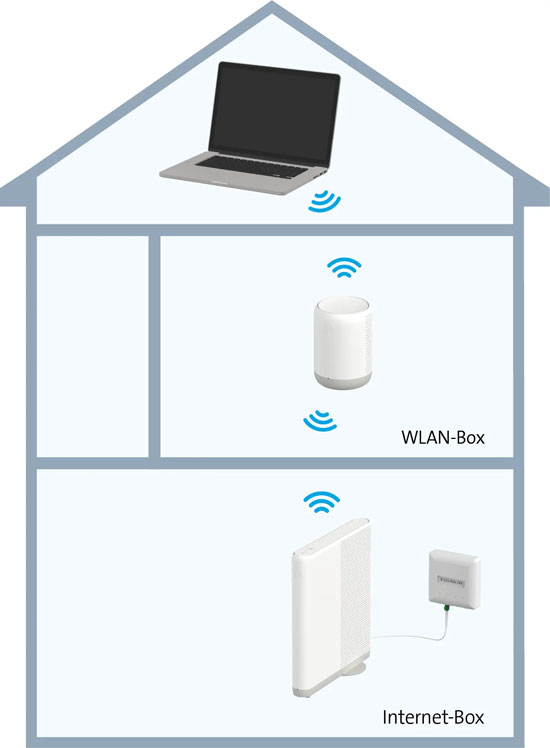
- Select the distance carefully: position the box about halfway between the Internet-Box and the area with poor reception. A position 1–2 rooms away from the Internet-Box usually suffices for optimum coverage.
- Connect by Ethernet where possible: an Ethernet cable provides the most stable speed and reduces interference. Use the existing domestic cabling or lay a new cable if necessary.
- Correctly distribute multiple boxes: use a maximum of four WLAN-Boxes and leave 1–2 rooms between the devices.
- Test the location in advance: test your WLAN in the My Swisscom app to detect any dead spots and find the best position.
Start testing
Tipp: Haben Sie die Box einmal gepairt, können Sie sie jederzeit an einen neuen Standort verschieben, ohne die Einrichtung erneut vornehmen zu müssen.
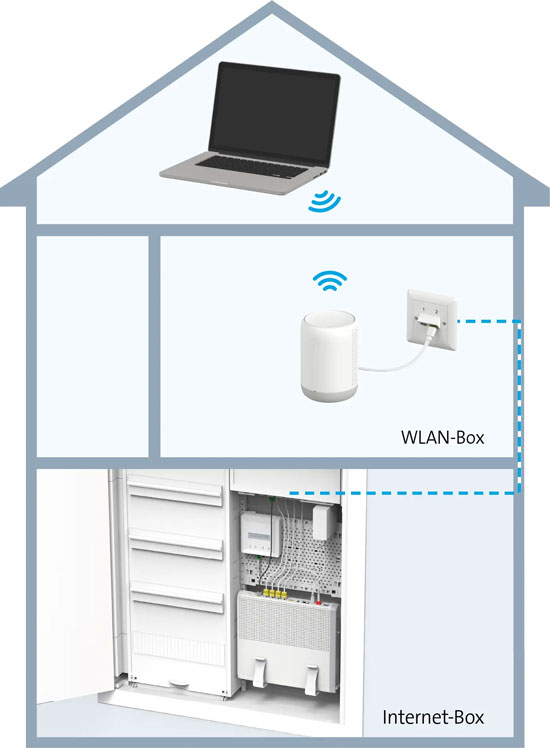
Connect via Ethernet cable
To optimise WLAN reception at home, connect your WLAN-Box to the Internet-Box with an Ethernet cable. We recommend this connection option in homes that have Ethernet network cabling or a distribution box. Place the WLAN-Box in the room where you need good WLAN and currently have poor reception. In the desired room, connect the WLAN-Box to the power supply and to the network via Ethernet cable.
WLAN connection
You can also easily connect the WLAN-Box to the Internet-Box by WLAN. To do this, place the WLAN-Box in a free-standing position approximately halfway between the Internet-Box (or existing WLAN-Box) and the device with poor WLAN reception.
Connect WLAN devices to the WLAN-Box
Devices connected via WLAN, such as laptops or mobile phones, automatically connect to the WLAN-Box. To connect other devices to your WLAN-Box, follow these instructions.
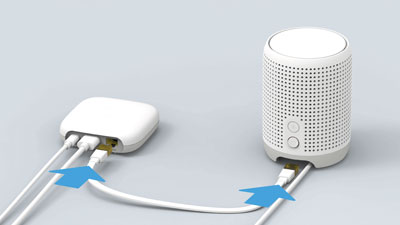
TV-Box or other wired devices
You can use the WLAN-Box to connect your TV-Box or other wired devices to the Internet if they are further away from the Internet-Box.
Instructions:
- Position the WLAN-Box adjacent to the TV-Box.
- Connect both boxes using an Ethernet cable.
- Connect the WLAN-Box to the Internet-Box (by cable or WLAN).
Please note: you can also connect other devices to the Ethernet ports on the WLAN-Box.
WPS-ready devices
The WPS (Wi-Fi Protected Setup) function enables you to connect your devices such as printers or IP radios at the touch of a button without entering the WLAN password. Press the plus (+) button on the WLAN-Box and activate the WPS function on your device within the next 2 minutes. Please note that not all devices support WPS and device manufacturers offer alternative solutions in many cases (e.g. via their own apps).
FAQs
How do I connect my Swisscom TV-Box to the WLAN-Box without using a cable?
Position your Swisscom TV-Box near to the WLAN-Box and connect it using the WLAN settings on the TV-Box.
How do I connect my Swisscom WLAN-Box?
You can easily connect your Swisscom WLAN-Box to the Internet-Box using the My Swisscom app or manually. Simply follow the instructions provided further up this page.
How can I set up my WLAN at home and improve the range?
The Swisscom WLAN-Box boosts the range of your WLAN network. Advice on optimum positioning and connection can be found in the section ‘Optimum WLAN-Box positioning’.
Why is the LED on my WLAN-Box flashing?
The status LED indicates the current status of your WLAN-Box. Click the overview for your WLAN-Box to find out more about the LED status.
Why is my WLAN connection poor?
These tips for optimum positioning help you to achieve a stable WLAN connection.
If you are experiencing Internet problems, check your connection using the Smart Support feature in My Swisscom.
Choose your support option

Arrange a callback
Choose a time slot and get support from a specialist over the phone.