Set up and use

App instructions
The My Swisscom App will guide you through a step-by-step setup process for your device.
Scan the QR code to get started.

App instructions
The My Swisscom App will guide you through a step-by-step setup process for your device.
Instructions (PDF)
Get to know the device
Buttons and connections

- Status-LED
- + button
- On/Off (power)
- Reset
- Power supply port
- Ethernet 2.5 Gbit/s
- Ethernet 1 Gbit/s
LED behaviour
| Steady white LED: | Everything OK. |
| Flashing white LED: |
|
| Pulsing white LED: | WLAN schedule is active on the Internet-Box. The WLAN-Box 5 is not currently transmitting WLAN. |
| Flashing red LED: | No connection to the Internet-Box. Either the WLAN-Box 5 is not paired or it is too far away from the Internet-Box. |
| Pulsing red LED: | Weak connection to the Internet-Box. Place the WLAN box 5 closer to the Internet box and as free-standing as possible. |
| Steady red LED: | No connection to the Internet-Box or error.
|
| Steady blue LED: | Defective WLAN-Box 5. Please contact Swisscom for a replacement. Please note that the LED temporarily lights up blue during the start-up process. Wait five minutes until the process is complete. |
Frequently asked questions
What is dualband Wi-Fi 7?
Wi-Fi 7 is the latest Wi-Fi standard for the technology of the future. With the 2.4 and 5 GHz bands, the WLAN-Box 5 is compatible with all WLAN devices, regardless of their Wi-Fi standard.
How do I install the WLAN-Box 5 without a smartphone via WLAN?
Installation of WLAN-Box 5 without the My Swisscom app
- Select the optimal location for your WLAN-Box – as centrally as possible between the Internet-Box and the room in which you want to improve the WLAN.
- Connect the WLAN-Box to the mains power and switch it on.
- As soon as the LED on the WLAN-Box flashes red, press the plus button (+) on the WLAN-Box and then the plus button (+) on the Internet-Box. Do this within two minutes.
- If the WLAN-Box 5 LED shows a steady white light, the devices have been successfully paired.
How do I install the WLAN-Box 5 without a smartphone via cable?
Installation of WLAN-Box 5 without the My Swisscom app
- Place the WLAN-Box in the room in which you want to improve the WLAN.
- Connect the WLAN-Box directly to the Internet-Box using the Ethernet cable supplied.
- Connect the WLAN-Box to the mains power and switch it on.
- If the WLAN-Box 5 LED shows a steady white light, the devices have been successfully paired.
How can I change the settings of my WLAN-Box 5?
Change the WLAN-Box 5 settings through the Internet-Box web portal. This is where you can change your WLAN access data, configure parental controls (surf times and time limits) or display all the connected devices.
On computers
Enter http://internetbox.swisscom.ch(opens in new tab) or 192.168.1.1(opens in new tab) in your Internet browser. Note that you have access only if you are connected to your Internet Box within the network. Log in with your existing admin password. If you do not know the password, click on "Set new password" to create a new password.
On smartphones
You can access and change your main settings at home on your smartphone via the My Swisscom app.
Which routers can I connect with the WLAN-Box 5?
The WLAN-Box 5 is compatible with the Internet-Box 2 and all more recent models. The Internet-Box plus and Internet-Box standard support the older WLAN standard (Wi-Fi 5) and are unable to reach the maximum WLAN speed of the WLAN-Box 5. In addition, these routers do not support the latest encryption standards, which can lead to incompatibilities with the WLAN-Box 5 For these reasons, the Internet-Box plus and Internet-Box standard are not compatible with the WLAN-Box 5.
Why does my WLAN printer no longer work after installation of the WLAN-Box 5?
To use Wi-Fi 7 with the WLAN-Box 5, WPA3 encryption is required. To ensure optimum WLAN-Box 5 function, WPA3 is automatically activated on the router during the installation process. Some older devices, such as WLAN printers, do not support this new standard and can therefore no longer connect to the WLAN. To connect your device (e.g. a printer) to the WLAN-Box 5, manually reset the WLAN encryption to WPA2.
Why does the WLAN-Box 5 have only 2 Ethernet ports instead of 3?
The main reason for removing the third Ethernet port is the new form factor with integrated cable management.
How much radiation does the WLAN-Box 5 emit?
The maximum WLAN transmit power of the WLAN-Box 5 is limited to 1 Watt per band and the device complies with all relevant regulatory limits and guidelines. To minimize radiation, the WLAN-Box 5 can also be switched off manually. In addition, the WLAN operating time settings from the Internet-Box are transferred automatically to the connected WLAN-Boxes.
How can I prevent a Wi-Fi 7 device switching to Wi-Fi 5 or 6 with the WLAN-Box 5?
To ensure your device will use Wi-Fi 7 to connect to the WLAN-Box 5 instead of the Wi-Fi 5 or 6 of Internet-Box 2, 3 or 4, do the following:
- Connect the WLAN-Box 5 to the Internet-Box with an Ethernet cable (WLAN Access Point).
- Deactivate the “Synchronise WLAN status between the Internet-Box and WLAN-Box” option in the web portal.
- Switch off the WLAN on the Internet-Box.
Is the guest WLAN range also extended by the WLAN-Box 5?
Yes, the guest WLAN works in the Internet-Box WLAN and in the WLAN-Box 5 reception range.
How much power does the WLAN-Box 5 consume? How do I save electricity?
Discover the electrical energy consumption of your WLAN-Box 5 here:
Check out these tips and discover how to save energy:
How do I update the firmware on my WLAN-Box 5?
Your router’s firmware will update automatically as soon as a new version is available.
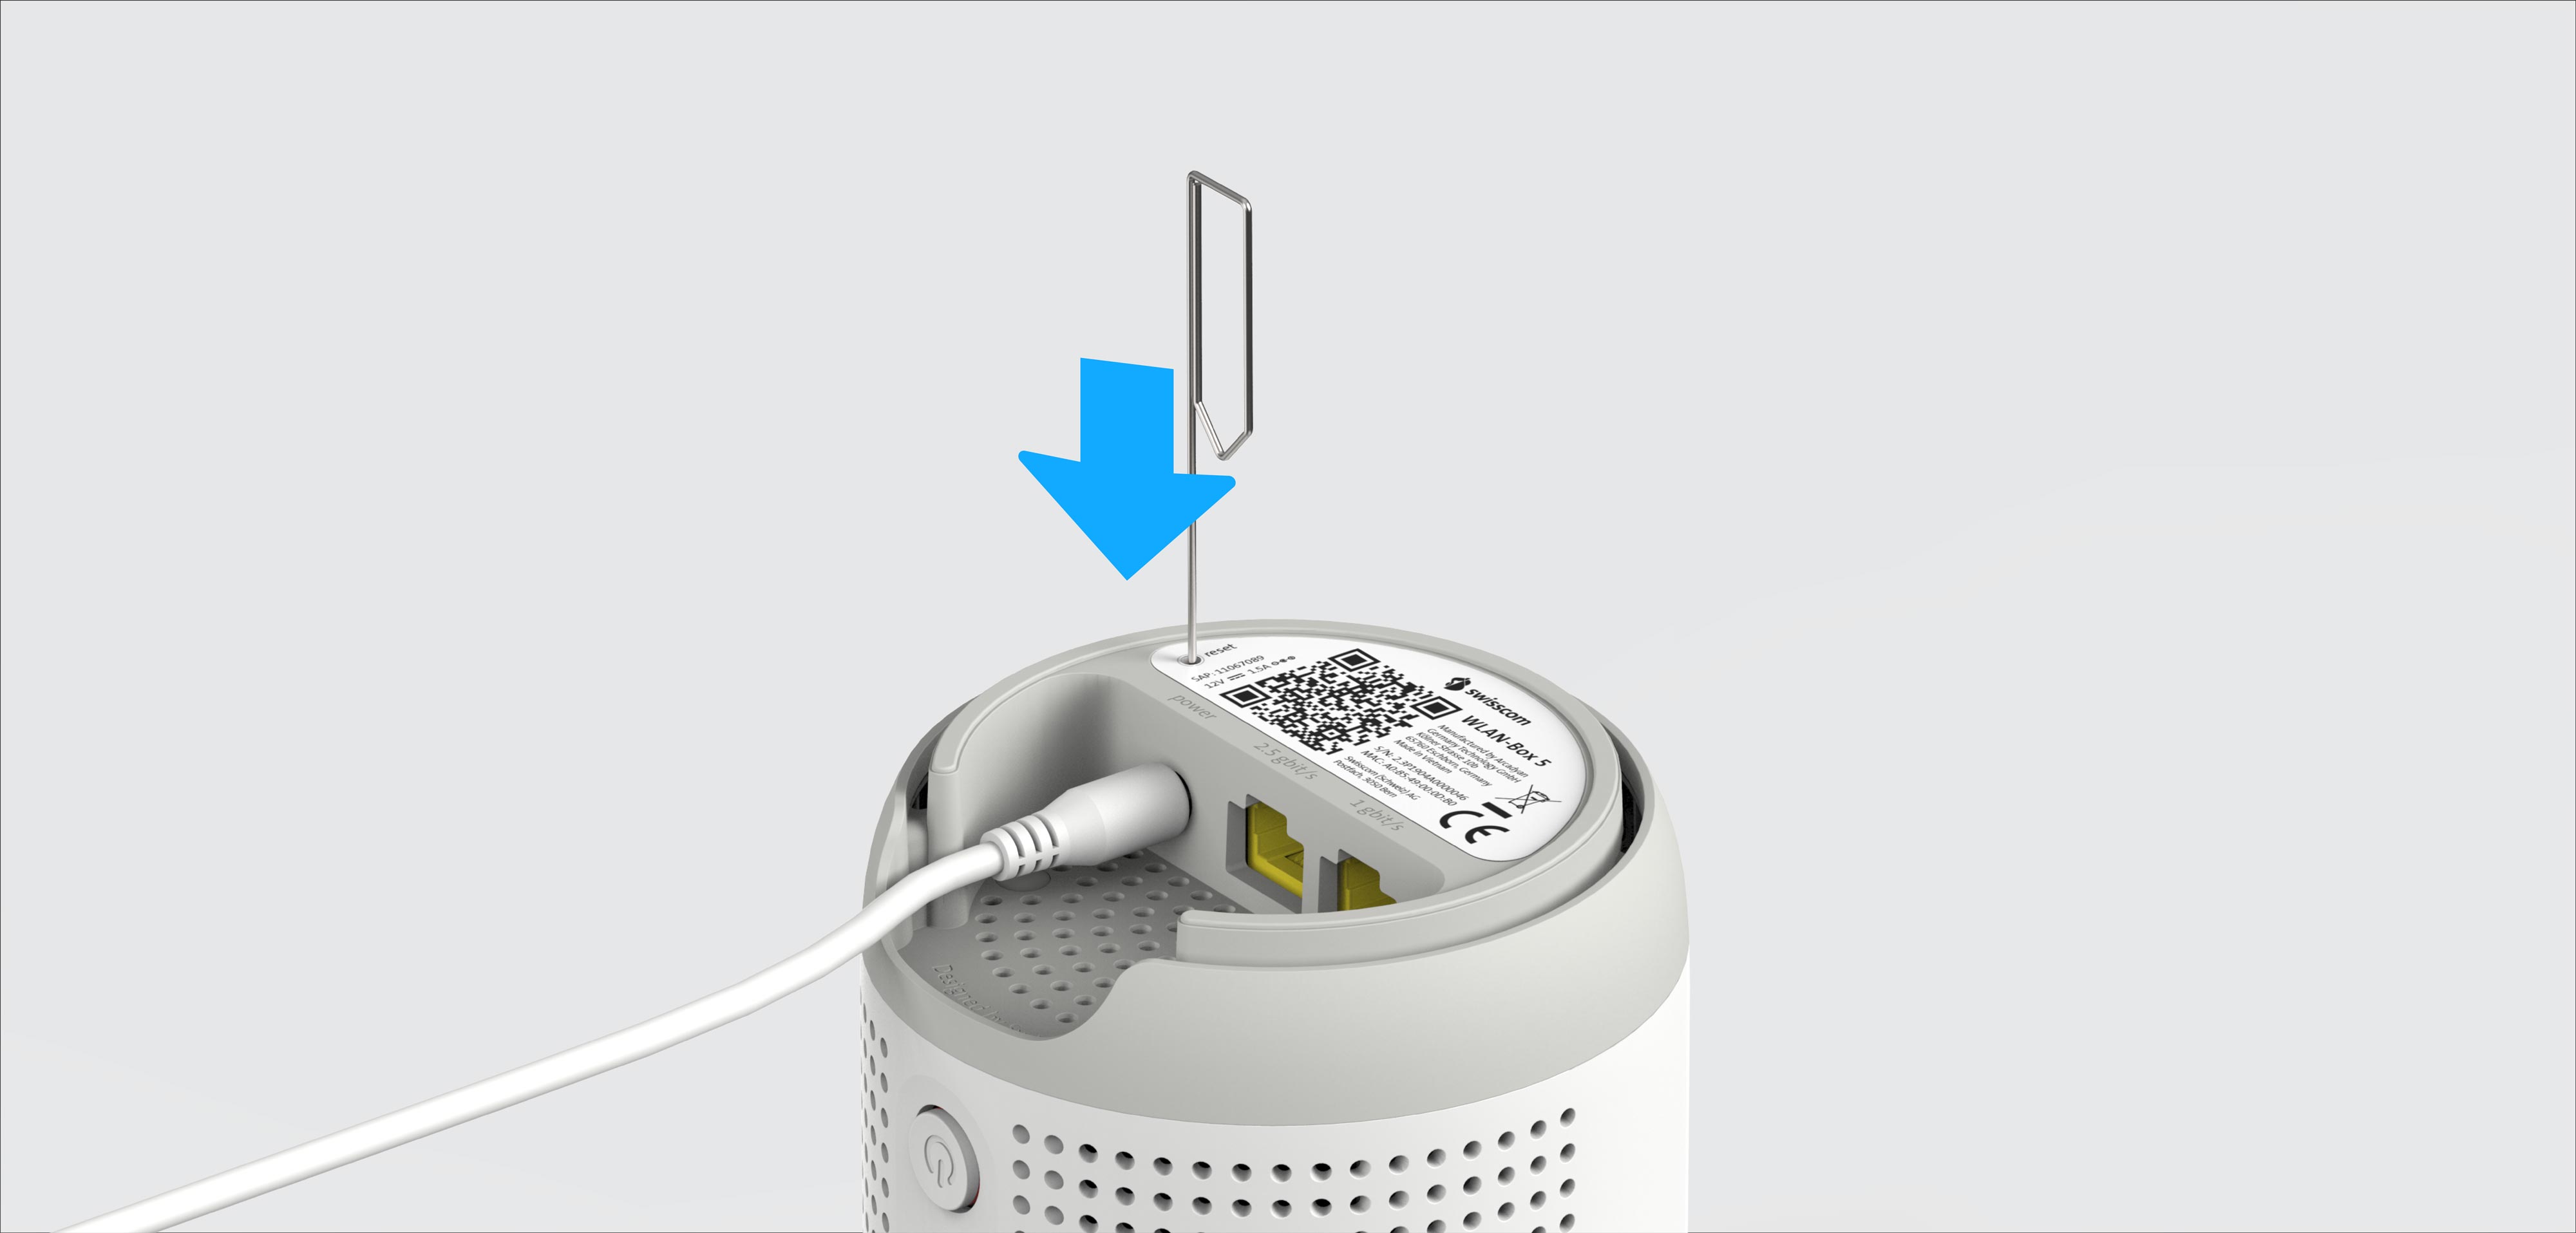
How do I reset my WLAN-Box 5 to factory settings?
If your WLAN-Box is experiencing issues and a restart doesn't solve them, the device can be reset to factory settings. Here's how to perform a reset on your WLAN-Box:
- Plug in the WLAN-Box and turn it on. Then, wait 2 minutes for the WLAN-Box to start up.
- Perform the reset using the method shown in the image below by pressing the reset button on the underside of the device with a pointed object for 1 second.
- After a successful reset, the status LED will start to blink white, and the WLAN-Box will restart.
After the reset, the device can be reinstalled using the My Swisscom App.
Choose your support option
Möchten Sie etwas bestellen? Wir beraten Sie
Manage your products, services and data directly in your account.
Open My Swisscom(opens a new window)
The digital assistant Sam helps you with questions about your Swisscom products.
Start ChatGet personal help from experienced Swisscom customers.
Go to help